© www.dtp-aus.com
![]()
| Using FRAMES - HTML 3.2 Frame <Tags> |
| We are all familiar with the use of frames and frame controlled pages on HTML web sites. But many web designers misuse frames where, rather than assist site/subject navigation, a lack of thought for users of various monitor resolutions combined with a futile attempt to place too many topics and objects in different windows etc has led to a widespread dislike for frames based sites.
However, assuming the thoughtful application of frames tags and multi HTML page windows, this tutorial first introduces you to a listing of frames tags included in the HTML 3.2 specifications followed by samples with code references. Browser specific extensions are also included. NOTE: Do not use frames just because you think they look cool or make you appear technically proficient. Use Frames to assist navigation of many pages over a large number of topics or at least construct your site so that a visitor can have a choice between Frames OR No Frames navigation. SOME SEARCH ENGINES ignore pages referenced within a master frames page, and do not lookup and "index" all your pages as they do from normal Hyperlinks to other pages in your site. ALSO, HTML 2.0 does not include Frame elements. But
first! General HTML 3.2 tags, Tables, Forms and Image Maps all have their own tutorials on this site. After completing this page, follow the back button above. Comments or suggestions are welcome; contact me via e-mail at webmaster@dtp-aus.com. |
FRAME TAGS and Attributes
| Amongst these tags are browser specific extensions
highlighted in red. Use these with caution. Primarily, but not only, Netscape's
"jumping the gun" by the early use of HTML 3.0 proposals has always created
problems for web page designers. There is no ratified HTML 3.0, and that
proposal was altered AND then ratified by the W3C as HTML 3.2. Considerations
for the most recent browsers should be ignored unless you are willing to confine efficient
viewing to only a portion of visitors to your site! 'Toys' are one thing, but efficient
information transfer should be your prime concern. |
| <FRAMESET> </FRAMESET> |
| A frames master page uses the <frameset>
tag pair instead of <body>. Each frameset must be defined before frame objects. As
you will see later in the samples, frameset tag pairs can be nested. <html> A layout that includes multiple frames across (columns) and down (rows) the page will
include multiple nested "framesets". Familiarise yourself with the basic
elements first. |
| <FRAMESET ROWS="?,?"> </FRAMESET> (pixels or %) |
| The values of this attribute define the row
height of each row (vertical) within the frameset. Each row height must be defined by a
value in pixels (fixed), percentage of browser window (variable), or as a relative value
of space remaining (variable - "*" see next). ie <frameset
rows="90%,10%"> or <frameset
rows="*,35"> |
| <FRAMESET ROWS="*"> </FRAMESET> (* = relative size) |
| Relative row height. Refers to "what ever
is remaining". Where multiple rows and/or columns are required, at least one row
and one column should be defined as a relative remaining variable value. ie
<frameset rows="*,35"> |
| <FRAMESET COLS="?,?"> </FRAMESET> (pixels or %) |
| The values of this attribute define the column
width of each column (horizontal) within the frameset. Each column width must be defined
by a value in pixels (fixed), percentage of browser window (variable), or as a relative
value of space remaining (variable - "*" see next). ie
<frameset cols="20%,80%"> or
<frameset cols="*,35"> |
| <FRAMESET COLS="*"> </FRAMESET> (* = relative size) |
| Relative column width. Refers to "what
ever is remaining". Where multiple rows and/or columns are required, at least one
row and one column should be defined as a relative remaining variable value. <frameset
cols="*,150"> |
| <FRAMESET FRAMEBORDER="yes|no|0"> </FRAMESET> |
| Controls the visibility of the borders around
all frames. The frameborder attribute enables you to turn off the border around frames in the frameset. Frameborder can also be used with the <frame> tag for single frames. Ne. 3+ uses values of yes or no. IE shows borders by default, or accepts a value of zero. (see "Borderless Frames" below for interoperability options) |
| <FRAMESET BORDER="?"> </FRAMESET> |
| Controls the width of all borders. This attribute allows you to set the width of the borders in a Ne. frameset; defined in pixels. Ne. 3+ only. |
| <FRAMESET BORDERCOLOR="#rrggbb"> </FRAMESET> |
| Controls the colour of all borders. Allows the user to set the colour of the frame borders in a Ne. frameset. Bordercolor can be used with the <frame> tag for single frames. Ne.3+ only. |
| <FRAME> </FRAME> (contents of an individual frame) |
| Defines frame objects within a frameset. ie
<frame name="framename"
src="yourpage.htm"> |
| <FRAME SRC="url|path"> |
| Defines the path or full URL to the HTML page
you want to appear in a named frame. Path refers to a local document, and URL refers to a
page on another server. ie <frame name="framename" src="yourpage.htm">
or ...src="http://...etc"> |
| <FRAME NAME="***"> </FRAME> |
| Each default HTML page must be targeted to
appear in a named frame. A hyperlink on a default page, to another page, will make that
other page appear in the frame it was called from unless the hyperlink also contains a
"target" attribute value pointing to one of the other named frames in the
browser window. ie <frame name="framename"
src="yourpage.htm"> - see TARGET |
| <FRAME TARGET="|_self|_parent|_top|_blank> </FRAME> |
Frame or Window Targeting. The
target attribute in a frameset is necessary for controlling which named frame window a
hyperlinked page is to appear in. A new page will appear by default in the same frame as
the page that called it via a hyperlink, unless the target attribute is used to direct the
new page to another named frame (see _top and _blank exceptions).
These show a few uses of the target attribute for framesets AND
general hyperlinks etc. |
| <FRAME MARGINWIDTH="?"> </FRAME> (left and right margins) |
| Margin width at the sides of frames. Sets the
left and right frame margins in pixels. By default, browsers will use inbuilt margin
sizes. |
| <FRAME MARGINHEIGHT="?"> </FRAME> (top and bottom margins) |
| Margin height top and bottom of frames. Sets
the top and bottom frame margins in pixels. By default, browsers will use inbuilt margin
sizes. |
| <FRAME SCROLLING="yes|no|auto"> </FRAME> |
| Enables you to control when scrollbars are to
appear on each frame window. The browser default is always 'auto', allowing the browser to
decide if the frame needs scrollbars when objects appear outside the frame window
boundaries. You can often use the "no" value if you design your objects to
appear within the boundaries of fixed size frames. ie one frame of cols="80,*"
and rows="200,*" could display without scrollbars because the frame window of 80
by 200 pixels will not dynamically change when the browser window is resized (assuming
objects within are smaller than the frame). |
| <FRAME NORESIZE> </FRAME> |
| Making individual frames non-resizable. Prevent
visitors from resizing frames created with this non-value attribute. By default the
browser allows frames to be resized by dragging the frame border. |
| <FRAME FRAMEBORDER="yes|no|0"> </FRAME> |
| Controls the visibility of the borders around
individual frames. The frame frameborder attribute enables you to turn off the border around individual frames. Frames connected to the preferred borderless frame should also include this attribute/value. Ne. 3+ uses values of yes or no. IE shows borders by default, or accepts a value of zero. (see "Borderless Frames" below for interoperability options) |
| <FRAME BORDERCOLOR="#rrggbb"> </FRAME> |
| Controls the colour of individual borders. Allows the user to set the colour of individual frame borders in a Ne. frameset. Ne.3+ only. |
| <FRAME FRAMESPACING="?"> </FRAME> |
| Controls the space between frames. This attribute sets clear space around the frame; defined in pixels. IE 3+ only. |
| <NOFRAMES> </NOFRAMES> (for non-frames capable browsers) |
| Unframed Page View. Even today, in 1998, many
of your visitors will not be using a browser that supports frames. More important than
providing the option to stop using or "get out of" frames, you must provide a
response for incompatible browsers. The "noframes" tag pair is a very simple
method of doing this. All you have to do is create a page that you want these visitors to
see instead of your frames view, and paste everything from the <body> tag to the
closing </body> tag, between the <noframes> tag pair. If you do not, then the
visitor will see nothing and quickly leave your site. <html> Note that this tag pair and content should appear before the last closing
</frameset> tag. |
| Creating BORDERLESS FRAMES |
| Whole Frameset. To hide all borders, and ensure compatibility with most browsers, include the following two attributes. Options not applicable to a browser will simply be ignored. <frameset
cols="105,*" frameborder="0"
framespacing="0"> Individual Frames not recommended. <frameset cols="105,*"> |
Samples, Code & descriptions
| Each of the following example views will open another browser window, and are simple in content. Once you have viewed each of them, close the new window and this page should remain open and ready for you to continue. | |
| When learning to read the HTML code for Tables,
it is best to see several basic samples, with the corresponding code, so that the very
distinct patterns of grouped table elements can be learned and recognised. Here I do the
same with Framesets and frameset elements. View each sample by clicking on the small
thumbnail image, then read the code and comments to identify each tag and tag attribute. Remember
the samples will be in a new window that you can close. To view the code in the sample pages, hold your Right Mouse Button down over the frame page that you wish to view, and select "View Source Code" from the drop down menu that appears. Mac users just hold your mouse button down over the page for a similar selection. NOTE: When crating master frame pages you must first create
the pages that are to appear in the frames by default, else an error will occur. |
|
| Sample One. The fameset tag that replaces the usual <body> tag starts the definition for a framed browser window. This sample only includes two rows as defined in the <frameset> tag. The first row is a small one of fixed height (45 pixels), followed by the next row that will change in size as the browser window is resized vertically (* = relative). | |
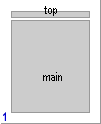 |
Then each <frame> is defined, also in order. The top frame could be a familiar topic menu with hyperlinks to the pages that are to appear in the main frame window. The top frame will not display scrollbars even if needed, and the visitor cannot resize it and alter the layout. The second frame will display scrollbars only if the browser detects the need for them (auto). Each frame must have a unique name. |
| You can see the links to the
"main" frame by viewing the code in the top window
of the sample. What makes the targeting seem magical is the "target=" attribute
as seen in this hyperlink: <a href="frmmain2.htm" target="main">Link 2</a> The <a href...></a> tag points to another HTML page, but it is the target attribute that directs the browser to load it into a named frame (main) other than the one it was called from. |
|
| <html> <head> <title>Frames Set with Header</title> </head> <frameset rows="45,*"> <frame name="top" scrolling="no" noresize src="frmhead1.htm"> <frame name="main" src="frmmain1.htm"> </frameset> </html> |
|
 |
Sample Two
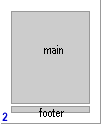
is similar to the first except for the following: Both frame windows will display scrollbars if needed (auto), and the <frameset> definition refers to frame heights as a percentage of the whole browser window. By resizing your browser vertically you should see the scrollbars appear and disappear. The small frame, now at the bottom, still cannot be resized by the visitor. |
| <html> <head> <title>Frames Set Simple Footer</title> </head> <frameset rows="90%,10%"> <frame name="main" src="frmmain1.htm" scrolling="auto"> <frame name="footer" scrolling="auto" noresize src="frmfoot3.htm"> </frameset> </html> |
|
| later in sample six you will learn about the significance of what I might refer to as the hierarchy of rows and columns. For now, just note that this sample only includes columns! | |
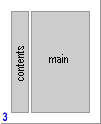 |
Sample Three shows another very familiar "frames" layout where the left hand frame remains static (ie a menu list), and each new page called from "contents" will appear in the "main" window. Note that any hyperlinks included in the main frame pages will open the linked page in the same frame window unless the "target=" attribute is included in the hyperlink to direct the new linked page to appear otherwise. Also, no "scrollbar" attributes have been included so they will appear if needed (the "auto" option is a browser default) |
| This method is offered on this site to view over 100 pages via menu lists of all pages. I believe it is better than offering a linked site map when many pages are involved. | |
| <html> <head> <title>Frames Set left Index 1</title> </head> <frameset cols="150,*"> <frame name="contents" src="frmleft1.htm" noresize> <frame name="main" src="frmmain1.htm"> </frameset> </html> |
|
| Sample Four is a combination of samples one and three. Often used, the top frame could include a neat set of menu buttons for general site topics that change the content list. The contents lists could then be alternate arrays of menu buttons linking to each item page within various topics. | |
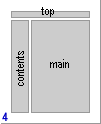 |
Now you can see how
"nested" framesets are used to refer to either rows (vertically) or columns (horizontally). The first frameset defines two rows; the small top frame and the lower area as a whole. The second frameset defines the split of columns within that lower area defined by the first frameset. |
| Note: Hyperlink "target" references link from the "top" to the "contents" frame, and from the "contents" frame to "main". Also, you will be able to resize the contents and main frames by dragging the cursor on the border. Why is this possible, but not for the top frame? | |
| <html> <head> <title>Frames Set, Index and Banner</title> </head> <frameset rows="64,*"> <frame name="top" scrolling="no" noresize src="frmtpc1.htm"> <frameset cols="150,*"> <frame name="contents" src="frmleft1.htm"> <frame name="main" src="frmmain1.htm"> </frameset> </frameset> </html> |
|
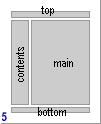 |
Sample Five may be familiar after 'surfing the net', but often causes a confusing mess for many visitors as the 'real estate' is now becoming overcrowded. This option is probably best used without borders and scrollbars, using pages carefully designed to appear in the many frames on monitors that may only have 640X480 resolution. Removing borders and scrollbars will be looked at later. |
| We still only have two framesets here, but the second frameset is placed between frames of the first frameset. Study the code carefully and understand the results from these slight changes to sample four, including the first <frameset> tag! | |
| <html> <head> <title>Frames Set, Index with Bannere and Footer</title> </head> <frameset rows="64,*,64"> <frame name="top" scrolling="no" noresize src="frmtpc1.htm"> <frameset cols="150,*"> <frame name="contents" src="frmleft1.htm"> <frame name="main" src="frmmain1.htm"> </frameset> <frame name="bottom" scrolling="no" noresize src="frmhead2.htm"> </frameset> </html> |
|
| If you have studied the tutorial on Tables, you should have noted the comment; that many professional level programmers will first draw a pencil sketch of the table layout they wish to use. Once sketched it is a relatively simple task to follow the rows, and columns of cells within the rows, to enter the correct pattern of Table Cell elements (tags and tag attributes). | |
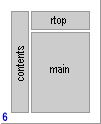 |
Sample Six
brings about an important difference to the samples viewed so far. Look at the thumbnail
and observe that the very first row is indeed a combination of columns. The other examples
with rows AND columns start at the top with a single row. Because the very first row is indeed a series of columns, we must now begin with a frameset tag that refers to cols first, not rows. |
| Tables use the <tr> element for distinct rows and various cell options are included within. Not quite so with frames. It is either a series of rows, OR a series of columns without any overall level definition like the <tr> in tables. So simply looking at our sketch tells us which is first, and how the rest should follow. The first column default width here is a fixed 150 pixels wide. This is the "contents" frame. The second column needs to be a variable size, so it is given the relative value (*, or "what's left"). Then the first column contents "frame" is defined, followed by the nested frameset for rows, which encloses the two rows within the second column. Again test which frames can be resized by dragging the cursor over the borders, and refer to the code below. | |
| <html> <head> <title>Frames Set Index with 2 pages</title> </head> <frameset cols="150,*"> <frame name="contents" scrolling="no" noresize src="frmleft1.htm"> <frameset rows="20%,*"> <frame name="rtop" src="frmhead2.htm"> <frame name="main" src="frmmain1.htm"> </frameset> </frameset> </html> |
|
| By viewing the sample you will also notice that this time the "rtop" frame only calls linked pages to its self, while the "contents" frame reacts the same as it does in sample three - so note the "target=" attributes in the <a href=...> tags of each page in this example. | |
| A word on browser defaults. I have left the 'scrollbars="auto" attribute out of most of these samples. However it is advisable to include it where necessary to ensure browser compatibility. |
|
| Margins Margin attributes are included in the <frame> tag and are: "marginwidth=" and "marginheight=". Click on this link to open another window with the first example, close the window and click on this link to view the second example. Between the two examples the effects of the margins attribute can be seen clearly. However, do note the way the 'scrollbars="auto" value affects left and right margins. Your browser will either add extra space to the right hand side, whether scrollbars are visible or not, or display an inactive scrollbar. Therefore take this into account when creating menu bars etc that you wish to fit right up to the top and left margins; 'scrollbars="no"' will not display this extra space. Removing Borders But before you charge in and remove borders and even scrollbars, remember to plan your pages so that any fixed size frames do not hide objects when viewed at 640X480 resolution. PS! |
| General HTML 3.2 tags, Tables, Forms and Image Maps all have their own tutorials on this site. After completing this page, follow the back button. |
| Over 120 pages: All major topics divided into Classrooms | ||||
| Free Backgrounds & Buttons! | DTP and HTML | "My First Page" HTML lessons | ||
| Tutorial Text Search | Perl CGI Scripts | Typography & Layout | ||
| 4 pages of Links | Visitors Book | Perl Scripts Forum n/a | ||
| Free Links page | Feedback Form | Q/A contact Forum | ||
| pages Designed & Published - Ron F Woolley | |
| ©1997 '98. Last Revised: Friday, 31 October 2003 22:04 |